
Lightroom
Screenshots
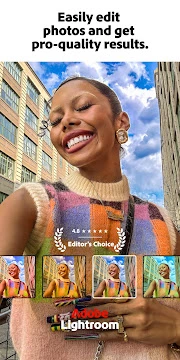


Adobe Photoshop Lightroom is a powerful tool. It helps photographers. They can organize, edit, and share their images. It’s not just for professional photographers. Amateurs can also use it. Lightroom simplifies the photo editing workflow.
This software offers many features. It’s a complete solution. You can manage your entire photo library. Edit your photos with precision. Share them with others easily. Let’s explore what makes Lightroom so essential.
Lightroom is designed for speed and simplicity. You can adjust colors, crop images, and apply presets in seconds. Plus, its seamless sync ensures your edits are available across all devices. Now, let’s explore what makes this app a must-have for photographers.
What Is Adobe Photoshop Lightroom?
Adobe Photoshop Lightroom is a powerful photo editing and management app. It helps photographers enhance, organize, and access their images on the go.
Core Functionality Explained
1. Non-Destructive Editing
Unlike traditional editors, Lightroom doesn’t permanently change your original files.
- All edits are saved as instructions, not direct alterations.
- You can undo or adjust any change without losing quality.
- This gives you complete creative freedom.
2. Cloud-Syncing Capabilities
Lightroom keeps your photos safe and accessible across devices.
- Photos sync automatically with Adobe Creative Cloud (premium feature).
- Your library stays backed up and secure.
- Access images from any device—Android, iOS, desktop, or web.
- Requires a stable internet connection for smooth syncing.
3. Organization and Management
Lightroom also works as a photo management tool.
- Sort, rate, and flag images for easy searching.
- Create custom albums and apply keywords.
- Use filters to quickly find specific photos.
Key Features of Lightroom: Powerful Editing On the Go
Adobe Lightroom brings professional photo editing to your fingertips. With a smooth interface and powerful tools, it helps you enhance images effortlessly. Below are its standout features.
1. User-Friendly Interface
Lightroom keeps things simple.
- Clean layout – Tools are well-organized for quick access.
- Easy navigation – Swipe and tap to edit without confusion.
This makes editing smooth, even for beginners.
2. Powerful Editing Tools
Lightroom offers advanced controls to refine your photos.
- Presets – Apply one-tap filters for instant effects.
- Curves & HSL sliders – Adjust colors and tones precisely.
- Selective adjustments – Edit specific areas without affecting the whole image.
These tools give you full creative control.
3. Cloud Sync & Cross-Platform Use
Your edits sync seamlessly across devices.
- Works with Lightroom Desktop & iOS – Start editing on Android and finish on a computer.
- Automatic cloud backups – Never lose your work.
This makes Lightroom perfect for photographers on the move.
4. RAW Photo Support
Shoot in RAW? Lightroom handles it perfectly.
- High-quality editing – Retain fine details and dynamic range.
- Professional-grade adjustments – Ideal for serious photographers.
RAW support ensures your photos look their best.
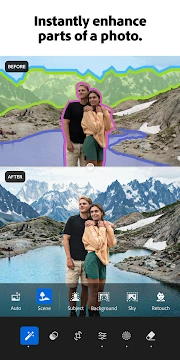
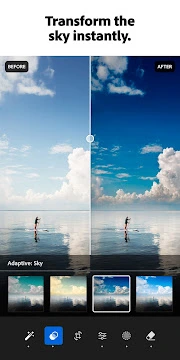
5. AI-Powered Enhancements
Artificial intelligence speeds up editing.
- Auto-tone – Fix exposure and colors instantly.
- AI masking – Select subjects or backgrounds with one tap.
- Noise reduction – Clean up grainy photos effortlessly.
AI saves time while improving results.
6. Selective Editing & Healing Brush
Make precise corrections easily.
- Selective adjustments – Modify specific parts of an image.
- Healing brush – Remove unwanted objects smoothly.
These tools help perfect every detail.
More Key Features of Lightroom: Advanced Editing Made Easy
Lightroom is packed with even more tools to enhance your photos. Whether you’re a beginner or a pro, these features help you edit like a master.
7. Pro Camera Mode
Shoot like a professional directly from the app.
- Manual controls – Adjust ISO, shutter speed, and white balance.
- HDR mode – Capture more detail in high-contrast scenes.
- DNG support – Shoot in RAW for maximum editing flexibility.
This turns your phone into a powerful camera.
8. Batch Editing & Presets
Save time by editing multiple photos at once.
- Sync edits across photos – Apply the same adjustments to a series.
- Create & save custom presets – Use your favorite edits again and again.
Perfect for editing large sets quickly.
9. Advanced Color Grading
Fine-tune colors for a cinematic look.
- Split toning – Add different tones to shadows and highlights.
- Color mixer – Adjust individual color hues, saturation, and luminance.
Great for creating unique styles.
10. Geometry & Lens Corrections
Fix distortions and straighten images effortlessly.
- Auto perspective correction – Fix tilted or skewed photos.
- Manual adjustments – Fine-tune vertical and horizontal lines.
- Lens profile support – Reduce distortions from wide-angle shots.
Makes every photo look perfectly aligned.
11. Speed Enhancements & Performance
Lightroom runs smoothly even on mid-range phones.
- Optimized for mobile – Fast processing with minimal lag.
- Offline editing – Work without an internet connection.
No more waiting—edit on the go without delays.
12. Social Sharing & Export Options
Share your edits in high quality.
- Direct upload to Instagram, Facebook, and more.
- Custom export settings – Choose resolution, format, and quality.
Get your photos online quickly and easily.
Adobe Photoshop Lightroom: Key Benefits for Mobile Photographers
Mobile photographers need powerful, flexible editing tools. Adobe Photoshop Lightroom delivers just that. Here’s why it’s a must-have app for on-the-go editing.
1. Convenience: Edit Anywhere, Anytime
- Edit on the go – No need for a computer. Adjust photos right after shooting.
- Instant sharing – Quickly tweak and post to social media without delays.
- No file transfers – Skip the hassle of moving files between devices.
With Lightroom, your phone becomes a full-featured editing studio.
2. Consistency: Seamless Sync Across Devices
- Cloud sync – Edits save automatically and update on all your devices.
- Continue anywhere – Start editing on your phone, finish on your desktop.
- Uniform style – Keep your portfolio looking consistent everywhere.
Never lose progress—your work stays in sync.
3. Quality: Professional Editing Tools
- Advanced controls – Adjust light, color, and details with precision.
- RAW support – Get the best quality from high-resolution files.
- Selective edits – Enhance specific areas without affecting the whole image.
Lightroom brings desktop-level editing to your Android device.
4. Workflow Efficiency: Save Time, Stay Organized
- All-in-one tool – Capture, edit, organize, and share in one app.
- Batch editing – Apply edits to multiple photos at once.
- Auto backups – Never lose your originals with cloud storage.
- Smart sorting – Find photos fast with filters and keywords.
Spend less time managing files and more time being creative.
Adobe Photoshop Lightroom: Free vs. Premium Features (Explained Simply)
Adobe Photoshop Lightroom is a powerful photo editing app. It offers both free and premium features. Let’s break down the differences to help you decide which version suits your needs.
Free Features in Lightroom
The free version includes essential tools for basic editing and organization:
- Basic adjustments (exposure, contrast, highlights, shadows).
- Color correction (white balance, vibrance, saturation).
- Crop and rotate tools.
- Presets (limited selection).
- Organization (albums, flags, ratings).
- Sharing options (export to social media or gallery).
These tools are great for quick edits. But for advanced control, you’ll need the premium version.
Premium Features (Creative Cloud Subscription Required)
Upgrading unlocks powerful tools and extra benefits:
- Selective edits (Healing Brush, Gradient Mask, Adjustment Brush).
- Advanced optics corrections (lens profiles, noise reduction).
- Cloud storage (1 TB for photo backups and syncing).
- Preset syncing (access your custom presets across devices).
- Full RAW editing support.
Premium is ideal for photographers who need precision and flexibility.
Which Version Should You Choose?
- Free version: Best for casual edits and basic adjustments.
- Premium version: Worth it for professionals and serious hobbyists.
Lightroom for Android gives you flexibility. Try the free version first. If you need more control, upgrade to premium.
Final tip: Adobe often offers free trials for premium features. Test them before committing!
Adobe Photoshop Lightroom: Core Editing Features Explained
Lightroom puts powerful photo editing tools in your pocket. Whether you’re a beginner or a pro, mastering its core features will help you enhance your images quickly.
Basic Adjustments: Essential Tools for Quick Enhancements
These tools help you fix exposure, color, and effects with simple sliders.
1. Light Adjustments
Control brightness, contrast, and shadows for a balanced look.
- Exposure: Brightens or darkens the entire image.
- Contrast: Increases or reduces the difference between light and dark areas.
- Highlights: Adjusts the brightest parts (e.g., skies, reflections).
- Shadows: Brightens or darkens dark areas (e.g., shadows, underexposed spots).
- Whites: Fine-tunes the brightest tones for pure whites.
- Blacks: Adjusts the darkest tones to avoid crushed shadows.
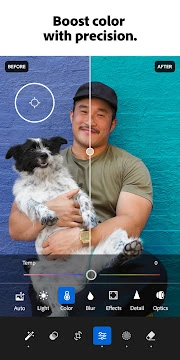
2. Color Adjustments
Fix color balance and make your photos pop.
- Temperature: Makes images warmer (yellow/orange) or cooler (blue).
- Tint: Balances green and magenta tones (great for fixing unnatural lighting).
- Vibrance: Boosts muted colors without oversaturating bright ones.
- Saturation: Increases or decreases all colors evenly.
3. Effects
Add finishing touches for a polished look.
- Clarity: Enhances mid-tone contrast for sharper details.
- Dehaze: Reduces fog or haze (ideal for landscapes).
- Vignette: Darkens or lightens edges to focus attention.
- Grain: Adds a film-like texture for a vintage feel.
4. Cropping and Straightening
Improve composition and fix crooked photos.
- Crop: Remove distractions or change aspect ratios (e.g., 1:1 for Instagram).
- Straighten: Fix tilted horizons using auto or manual adjustments.
How to Use These Tools Effectively
- Start with Exposure – Adjust brightness first.
- Fine-Tune Contrast – Make shadows and highlights stand out.
- Balance Colors – Fix white balance and boost vibrancy.
- Add Effects – Use clarity and dehaze for extra depth.
- Crop & Straighten – Perfect your composition last.
With these tools, Lightroom for Android makes professional editing easy. Try each slider and see how they transform your photos!
Adobe Photoshop Lightroom: Advanced Editing Tools
Lightroom offers powerful tools for fine-tuning and artistic control. These features help you enhance your photos with precision and creativity.
1. Color Mixer (HSL)
The HSL tool (Hue, Saturation, Luminance) gives you precise control over colors.
- Hue: Change specific colors (e.g., turn blue skies into teal).
- Saturation: Boost or mute certain colors without affecting others.
- Luminance: Brighten or darken individual color ranges.
This tool is perfect for fixing skin tones, making colors pop, or creating unique looks.
2. Split Toning
Split toning lets you apply different colors to highlights and shadows.
- Create cinematic looks (warm highlights with cool shadows).
- Add vintage effects for a nostalgic feel.
- Experiment with creative color grading.
3. Detail Panel
This panel improves sharpness and reduces noise.
Sharpening
- Enhances edges for crisper details.
- Works best in moderation to avoid unnatural results.
Noise Reduction
- Reduces graininess in low-light photos.
- Smooths out luminance noise for cleaner images.
Color Noise Reduction
- Removes colored speckles in high-ISO or underexposed shots.
4. Optics Panel
Fixes common lens issues for clearer photos.
Chromatic Aberration Removal
- Eliminates color fringing around edges.
- Works automatically for quick corrections.
Geometry Distortions
- Corrects barrel or pincushion distortion.
- Uses lens profiles for accurate adjustments.
Adobe Photoshop Lightroom: Master Selective Adjustments
Lightroom gives you precise control over your edits with selective adjustments. These premium tools let you tweak specific parts of your photo—not the whole image.
Why Use Selective Adjustments?
- Fix only the areas that need improvement.
- Avoid over-editing the entire photo.
- Get professional-level results on the go.
Now, let’s explore each tool.
1. Healing Brush: Remove Unwanted Objects
The Healing Brush helps clean up imperfections.
How it works:
- Samples nearby pixels.
- Blends edits naturally.
Best for:
- Dust spots.
- Small blemishes.
- Distracting objects.
2. Radial Gradient: Spotlight Effects
This tool creates circular or oval masks with smooth transitions.
How to use it:
- Place the gradient over your subject.
- Adjust exposure, contrast, or color.
Great for:
- Highlighting a focal point.
- Darkening edges (vignette effect).
- Simulating natural light.
3. Linear Gradient: Enhance Skies & Landscapes
A rectangular mask that fades gradually.
How to apply it:
- Drag over skies or foregrounds.
- Adjust brightness, warmth, or clarity.
Perfect for:
- Balancing exposure (darkening bright skies).
- Adding depth to landscapes.
- Mimicking a graduated ND filter.
4. Brush Tool: Precision Edits
The Brush offers the most control. Paint adjustments exactly where needed.
Key features:
- Adjustable size, feather, and flow.
- Works for dodging & burning.
- Ideal for localized corrections.
Best uses:
- Brightening eyes.
- Sharpening specific areas.
- Fixing uneven skin tones.
Adobe Photoshop Lightroom: Master Presets for Speed, Style & Consistency
Presets in Adobe Photoshop Lightroom make photo editing faster and easier. They help you apply stunning edits with just one tap. Whether you’re a beginner or a pro, presets can enhance your workflow and keep your photos looking consistent.
What Are Presets?
Presets are pre-saved editing adjustments. They let you apply the same look to multiple photos instantly.
Why Use Presets?
- Speed up editing – No need to adjust every setting manually.
- Maintain consistency – Keep the same style across all your photos.
- Experiment with styles – Try different looks quickly.
Types of Presets in Lightroom
1. Built-in Presets (Default Presets)
Lightroom comes with ready-to-use presets. These include:
- Black & white conversions
- High contrast looks
- Vintage tones
- Modern color grades
Best for: Beginners who want quick, professional edits.
2. Create & Save Your Own Presets
Once you perfect an edit, save it as a custom preset.
How to do it:
- Edit a photo manually.
- Tap the three dots (⋮) in the top-right corner.
- Select “Create Preset.”
- Name your preset and save it.
Benefits:
- Saves time – Apply your favorite edits instantly.
- Consistency – Match the style of a photo series (e.g., weddings, travel albums).
3. Import Third-Party Presets
Many photographers sell or share preset packs. Lightroom supports DNG-based presets.
How to import:
- Download a preset pack (usually in .DNG or .XMP format).
- Open Lightroom and go to “Presets”.
- Tap “Import Presets” and select your files.
Benefits:
- Expand creativity – Try new styles from professional photographers.
- Unique looks – Stand out with exclusive edits.
Final Tips for Using Presets
- Adjust after applying – Fine-tune exposure or colors if needed.
- Organize presets – Group them by style (e.g., “Portrait,” “Landscape”).
- Experiment – Mix and match presets for unique results.
Conclusion
Presets in Lightroom make editing fast, stylish, and consistent. Whether you use built-in, custom, or third-party presets, they help you achieve professional results effortlessly.
Start using presets today and transform your photos in seconds!
Organize & Manage Photos Like a Pro with Adobe Photoshop Lightroom
Keeping your photo library tidy is easy with Adobe Photoshop Lightroom. Here’s how its organization and workflow tools help you stay in control.
Albums: Group Photos for Easy Access
- Create albums like folders to sort photos by event, project, or theme (e.g., “Travel 2024,” “Portraits,” “Wedding Shots”).
- Nest albums inside others for a structured system—perfect for large collections.
- Share albums directly from the app, creating web galleries for clients or friends.
With albums, finding photos later is quick and hassle-free.
Ratings & Flags: Sort Your Best Shots Fast
Lightroom helps you filter and prioritize images efficiently.
1. Star Ratings
- Use 1 to 5 stars to rank photos.
- ★★★★★ = Absolute favorites
- ★★★ = Good keepers
- ★ = May delete later
2. Flags for Quick Decisions
- Pick (white flag) = Keep and edit
- Reject (black flag) = Discard later
3. Filter for Speed
After rating, filter by stars, flags, or date to see only the best shots.
This system saves time when selecting top images.
Keywords (Premium Feature)
- Add descriptive tags like “sunset,” “beach,” or “Paris.”
- Later, search your entire library in seconds (e.g., “Show all sunset photos from Paris”).
- Perfect for long-term organization, especially for large collections.
Cloud Syncing & Backup: Edit Anywhere
- Automatic sync saves photos to Adobe Creative Cloud.
- Access edits across devices—start on Android, finish on desktop.
- Safe backups protect against device loss or damage.
With cloud sync, your workflow stays smooth and secure.
Final Thoughts
Lightroom simplifies photo management with:
- Albums for easy grouping
- Ratings & flags for quick sorting
- Keywords (Premium) for smart searches
- Cloud sync for backup & cross-device editing
Try these tools today and take control of your photo library!
Adobe Photoshop Lightroom: Power User Tips & Tricks
Lightroom is a powerful photo-editing tool. But are you using it to its full potential? Here are some pro tips to boost your workflow.
Use the Built-in Camera for Better Shots
Don’t just import photos—shoot directly in Lightroom. Its camera module offers features most stock Android cameras lack:
- Professional mode – Adjust ISO, shutter speed, white balance, and focus manually.
- DNG (RAW) capture – Get higher-quality files than JPEGs for better editing flexibility.
- Live histograms & leveling guides – Perfect exposure and composition before shooting.
Pro tip: Shooting in RAW gives you more control in post-processing.
Save Time with Batch Editing
Editing multiple similar photos? Batch editing speeds things up:
- Edit one photo to perfection.
- Tap “Copy Settings” and choose which adjustments to apply.
- Select other photos and tap “Paste Settings”.
Why it’s great:
- Consistent look across all images.
- Cuts repetitive work.
Combine Lightroom with Other Adobe Apps
Lightroom works well with Adobe’s ecosystem:
- Photoshop Express – Add text, collages, or extra effects.
- Cloud Sync – Start editing on mobile, finish on desktop without losing changes.
Best for: Advanced edits needing Photoshop’s tools.
Optimize Battery & Storage
Lightroom can drain battery and storage. Try these fixes:
- Limit background sync when on mobile data or low battery.
- Store only smart previews (not full originals) to save space.
- Clear app cache occasionally in Android settings.
- Export & delete old files after cloud backup.
Always Update the App
Adobe releases regular updates with:
- New features.
- Performance improvements.
- Bug fixes.
- Better camera & lens support.
Keep Lightroom updated for the best experience.
Final Thoughts
Mastering these Lightroom tricks will:
- Improve photo quality.
- Speed up editing.
- Save storage & battery.
Try them today and take your mobile editing to the next level!
How to Download and Install Adobe Photoshop Lightroom APK for Android
Adobe Photoshop Lightroom is a powerful photo editing app. It helps enhance images with professional tools. If you want to install Lightroom on your Android device, follow this simple guide.
Steps to Download and Install Lightroom APK
1. Enable Unknown Sources
Since Lightroom APK is not from the Google Play Store, you must allow installations from unknown sources.
- Open Settings on your Android device.
- Go to Security & Privacy (or Apps & Notifications on some devices).
- Find Install Unknown Apps or Unknown Sources.
- Enable it for your browser or file manager.
2. Download the Lightroom APK File
Next, download the APK from a trusted source.
- Visit Ekuore.com.
- Search for “Adobe Photoshop Lightroom APK”.
- Choose the latest version.
- Tap Download and wait for the file to save.
3. Install the APK File
After downloading, follow these steps:
- Open your File Manager app.
- Locate the downloaded APK file (usually in the Downloads folder).
- Tap the file and select Install.
- Wait for the installation to finish.
4. Open and Sign In to Lightroom
Once installed:
- Open the Lightroom app from your home screen.
- Sign in with your Adobe ID or create a new account.
- Start editing your photos!
Frequently Asked Questions About Adobe Photoshop Lightroom
Is Lightroom Free?
Yes, Lightroom has a free version. However, it has some limitations:
- Advanced features require a premium subscription.
- Free users get basic editing tools.
For full access, you need an Adobe Creative Cloud plan.
How Does Lightroom Compare to the Desktop Version?
The Android app offers many desktop features but with a simplified interface. Key differences include:
- Fewer advanced masking tools.
- Optimized for touch controls.
- Cloud sync for seamless editing across devices.
Can I Use Lightroom Without an Internet Connection?
Yes, you can edit photos offline. However:
- You need an internet connection to sync edits.
- Some cloud-based features won’t work offline.
How Do I Import Photos into Lightroom on Android?
Importing photos is easy. Follow these steps:
- Open Lightroom and tap the “+” icon.
- Select “Add Photos”.
- Choose images from your gallery or camera.
Does Lightroom Support RAW Files?
Yes, Lightroom supports RAW files on Android. This allows for:
- Higher-quality edits.
- More control over exposure and colors.
Can I Export Photos in High Quality?
Absolutely. When exporting, you can choose:
- Image format (JPEG, PNG, etc.).
- Quality settings.
- Custom resolution.
How Do I Sync Lightroom Edits Between Android and Desktop?
To sync edits:
- Sign in with the same Adobe ID on both devices.
- Enable “Sync with Lightroom” in settings.
- Edits will update automatically.
Are Presets Available in Lightroom?
Yes, you can use presets. Options include:
- Built-in Adobe presets.
- Custom presets you create or download.
How Can I Fix Performance Issues on Lightroom?
If the app is slow, try these fixes:
- Clear the app cache.
- Close background apps.
- Update to the latest version.
Does Lightroom Have a Healing Brush?
Yes, Lightroom includes a Healing Brush tool. You can use it to:
- Remove blemishes.
- Erase unwanted objects.
- Fix small imperfections in photos.
Can I Edit Videos in Lightroom?
No, Lightroom is designed for photo editing only. For video editing, try Adobe Premiere Rush.
How Do I Adjust Colors and White Balance?
Lightroom offers multiple tools for color correction:
- White Balance Slider – Fix warm or cool tones.
- HSL Panel – Adjust hue, saturation, and luminance.
- Color Grading – Fine-tune shadows, midtones, and highlights.
Is There a Way to Batch Edit Photos?
Yes! You can apply edits to multiple photos at once:
- Edit one photo.
- Tap the three dots (⋮) and select “Copy Settings”.
- Choose other photos and tap “Paste Settings”.
How Do I Use Lightroom’s AI-Powered Features?
Lightroom includes AI tools like:
- Auto Adjust – Automatically enhances exposure and colors.
- Selective Edits with AI Masks – Isolate subjects, skies, or backgrounds.
- Enhance Details – Improves sharpness in RAW files.
Can I Share Edited Photos Directly from Lightroom?
Yes, you can share photos easily:
- Tap the Share icon (↗).
- Choose a platform (Instagram, WhatsApp, etc.).
- Adjust export settings if needed.
Why Are Some Features Missing in the Android App?
The mobile version is streamlined for touch use. Some advanced tools (like full Photoshop layers) are only available on desktop.
Does Lightroom Support HDR Editing?
Yes, you can edit HDR photos. The app supports:
- HDR Merge (for premium users).
- Tone mapping adjustments.
How Do I Organize Photos in Lightroom?
Use these organization tools:
- Albums – Group similar photos.
- Flags & Ratings – Mark favorites.
- Keywords – Tag images for easy searching.
Can I Use Lightroom on Multiple Android Devices?
Yes, if you log in with the same Adobe ID. Your edits sync across devices via the cloud.
How Do I Recover Deleted Photos in Lightroom?
If you delete a photo:
- Go to the “Deleted” folder in Lightroom.
- Tap and hold the image.
- Select “Restore”.
Note: Deleted photos stay in the trash for 60 days.
Does Lightroom Work on Tablets?
Yes! Lightroom is optimized for both phones and tablets, with a responsive layout.
How Can I Reduce Storage Usage?
To save space:
- Enable “Store Originals in Cloud” in settings.
- Use Smart Previews (smaller file versions).
- Clear cached files regularly.
Can I Use Third-Party Presets?
Yes! To install custom presets:
- Download a .DNG or .XMP preset file.
- Import it via Lightroom’s Presets section.
How Do I Contact Adobe Support for Lightroom Issues?
If you need help:
- Visit Adobe’s Help Center.
- Use in-app support (Settings > Help & Support).
- Reach out on Adobe’s community forums.